Khi làm một dự án Laravel thông thường thì mọi người hay sử dụng bootstrap để làm giao diện cho trang web. Nhưng hôm nay trong bài viết này mình sẽ giới thiệu cho các bạn một framework CSS đó là Tailwind CSS và cách tích hợp chúng vào dự án Laravel.
Giới thiệu
Tailwind CSS là một utility-first CSS framework. Không giống như những frame work khác, Tailwind CSS không có các component sẵn để sử dụng như bootstrap( .btn, .card, ...) mà ta sử dụng utility-based class để style cho trang web. Chúng ta chỉ cần nhớ và hiểu được cách đặt tên và mẫu của các class là có thể sử dụng gần như thành thạo các utility-based class mà không cần đến docs của chúng. Ngoài ra Tailwind CSS còn một số ưu điểm khác để tìm hiểu kỹ hơn các bạn có thể xem ở đây
Ví dụ về một button được style bằng Tailwind CSS.

<button class="bg-blue-500 hover:bg-blue-700 text-white font-bold py-2 px-4 rounded">
  Button
</button>

<div class="max-w-md mx-auto bg-white rounded-xl shadow-md overflow-hidden md:max-w-2xl">
  <div class="md:flex">
    <div class="md:flex-shrink-0">
      <img class="h-48 w-full object-cover md:h-full md:w-48" src="/img/store.jpg" alt="Man looking at item at a store">
    </div>
    <div class="p-8">
      <div class="uppercase tracking-wide text-sm text-indigo-500 font-semibold">Case study</div>
      <a href="#" class="block mt-1 text-lg leading-tight font-medium text-black hover:underline">Finding customers for your new business</a>
      <p class="mt-2 text-gray-500">Getting a new business off the ground is a lot of hard work. Here are five ideas you can use to find your first customers.</p>
    </div>
  </div>
</div>
Tích hợp Tailwind CSS vào dự án Laravel
Chuẩn bị
Để cài đặt được thì máy tính của bạn phải có Node.js từ phiên bản 12.13.0 trở lên.
Cài đặt Tailwind CSS
Ta sẽ dùng terminal để tiến hành cài đặt. Các câu lệnh chạy đều được chạy trong thư mục project Laravel. Trước khi tiến hành cài đặt các bạn hãy chạy npm install để cài các package front-end của Laravel.
Để cài đặt Tailwind CSS ta chạy lệnh.
npm install -D [email protected] [email protected] [email protected]
Tạo file cấu hình
Ta sẽ tạo một file tailwind.config.js tại thư mục root của project.
Chạy câu lệnh.
npx tailwindcss init
File tailwind.config.js sẽ có cấu trúc như sau.
module.exports = {
  purge: [],
  darkMode: false, // or 'media' or 'class'
  theme: {
    extend: {},
  },
  variants: {
    extend: {},
  },
  plugins: [],
}
Các bạn có thể tùy trình file cấu hình này theo ý muốn của mình. Tham khảo tại đây.
Cấu hình Tailwind trong Laravel Mix
Trong file webpack.mix.js ta thêm như sau.
mix.js("resources/js/app.js", "public/js")
    .postCss("resources/css/app.css", "public/css", [
         require("tailwindcss"),
    ]);
Thêm Tailwind vào file CSS
Trong file ./resources/css/app.css ta thêm các dòng sau.
@tailwind base;
@tailwind components;
@tailwind utilities;
Khi đã thêm vào trong file CSS để sử dụng được chúng ta phải thêm file CSS vào những layouts mà chúng ta muốn sử dụng Tailwind CSS. Ở đây mình thêm vào file resources/views/layouts/app.blade.php.
...
<head>
    <meta charset="UTF-8">
    <meta http-equiv="X-UA-Compatible" content="IE=edge">
    <meta name="viewport" content="width=device-width, initial-scale=1.0">
    <link href="{{ asset('css/app.css') }}" rel="stylesheet">
    <link href="{{ asset('css/font.css') }}" rel="stylesheet">
    <title>Document</title>
</head>
...
Sau khi đã thêm vào file bạn chạy lênh npm run dev hoặc npm run watch (để thay dõi các thay đổi trong file css ở thư mục resources).
Debug
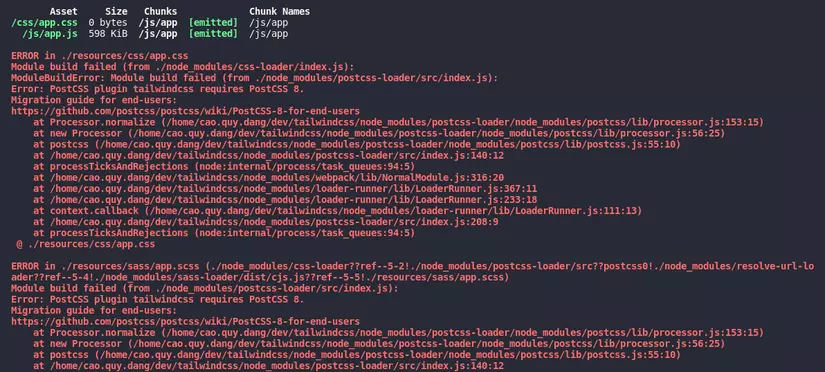
Khi các bạn đã cài đặt và setup xong mà chạy npm run dev mà gặp lỗi như sau.

Ta sẽ tiến hành sửa lại để sử dụng PostCSS 7 thay vì bản PostCSS 8. Mở terminal và chạy lệnh.
npm uninstall tailwindcss postcss autoprefixer
npm install -D [email protected]:@tailwindcss/postcss7-compat [email protected]^7 [email protected]^9
Sau khi đã chạy xong ta tiến hành chạy npm run dev để xem đã thành công chưa.

Như vậy là đã thành công và ta có thể sử dụng Tailwind trong file blade template được rồi.
Demo
Ta sẽ tiến hành tạo thử một Image Gallery đơn giản bằng Tailwind.
<!DOCTYPE html>
<html lang="en">
<head>
    <meta charset="UTF-8">
    <meta http-equiv="X-UA-Compatible" content="IE=edge">
    <meta name="viewport" content="width=device-width, initial-scale=1.0">
    <link href="{{ asset('css/app.css') }}" rel="stylesheet">
    <title>Tailwind CSS</title>
</head>
<body>
    <div class="w-3/4 m-auto text-center">
        <h1 class="text-7xl mb-4 text-green-600">Gallery</h1>
        <div class="flex flex-wrap w-full">
            <div class="flex-1 mr-4">
                <div class="w-full mb-4"><img class="w-full" src="https://images.pexels.com/photos/7790601/pexels-photo-7790601.jpeg?auto=compress&cs=tinysrgb&dpr=1&w=500" alt=""></div>
                <div class="w-full mb-4"><img class="w-full" src="https://images.pexels.com/photos/7814168/pexels-photo-7814168.jpeg?auto=compress&cs=tinysrgb&dpr=1&w=500" alt=""></div>
                <div class="w-full mb-4"><img class="w-full" src="https://images.pexels.com/photos/7505204/pexels-photo-7505204.jpeg?auto=compress&cs=tinysrgb&dpr=1&w=500" alt=""></div>
                <div class="w-full mb-4"><img class="w-full" src="https://images.pexels.com/photos/7363186/pexels-photo-7363186.png?auto=compress&cs=tinysrgb&dpr=1&w=500" alt=""></div>
                <div class="w-full mb-4"><img class="w-full" src="https://images.pexels.com/photos/7438506/pexels-photo-7438506.jpeg?auto=compress&cs=tinysrgb&dpr=1&w=500" alt=""></div>
                <div class="w-full mb-4"><img class="w-full" src="https://images.pexels.com/photos/7516906/pexels-photo-7516906.jpeg?auto=compress&cs=tinysrgb&dpr=1&w=500" alt=""></div>
            </div>
            <div class="flex-1 mr-4">
                <div class="w-full mb-4"><img class="w-full" src="https://images.pexels.com/photos/7451734/pexels-photo-7451734.jpeg?auto=compress&cs=tinysrgb&dpr=1&w=500" alt=""></div>
                <div class="w-full mb-4"><img class="w-full" src="https://images.pexels.com/photos/7216963/pexels-photo-7216963.jpeg?auto=compress&cs=tinysrgb&dpr=1&w=500" alt=""></div>
                <div class="w-full mb-4"><img class="w-full" src="https://images.pexels.com/photos/7783923/pexels-photo-7783923.jpeg?auto=compress&cs=tinysrgb&dpr=1&w=500" alt=""></div>
                <div class="w-full mb-4"><img class="w-full" src="https://images.pexels.com/photos/6580691/pexels-photo-6580691.jpeg?auto=compress&cs=tinysrgb&dpr=1&w=500" alt=""></div>
                <div class="w-full mb-4"><img class="w-full" src="https://images.pexels.com/photos/7783923/pexels-photo-7783923.jpeg?auto=compress&cs=tinysrgb&dpr=1&w=500" alt=""></div>
                <div class="w-full mb-4"><img class="w-full" src="https://images.pexels.com/photos/7532824/pexels-photo-7532824.jpeg?auto=compress&cs=tinysrgb&dpr=1&w=500" alt=""></div>
            </div>
            <div class="flex-1 mr-4">
                <div class="w-full mb-4"><img class="w-full" src="https://images.pexels.com/photos/7814168/pexels-photo-7814168.jpeg?auto=compress&cs=tinysrgb&dpr=1&w=500" alt=""></div>
                <div class="w-full mb-4"><img class="w-full" src="https://images.pexels.com/photos/3376069/pexels-photo-3376069.jpeg?auto=compress&cs=tinysrgb&dpr=1&w=500" alt=""></div>
                <div class="w-full mb-4"><img class="w-full" src="https://images.pexels.com/photos/7505204/pexels-photo-7505204.jpeg?auto=compress&cs=tinysrgb&dpr=1&w=500" alt=""></div>
                <div class="w-full mb-4"><img class="w-full" src="https://images.pexels.com/photos/7783923/pexels-photo-7783923.jpeg?auto=compress&cs=tinysrgb&dpr=1&w=500" alt=""></div>
                <div class="w-full mb-4"><img class="w-full" src="https://images.pexels.com/photos/6580691/pexels-photo-6580691.jpeg?auto=compress&cs=tinysrgb&dpr=1&w=500" alt=""></div>
                <div class="w-full mb-4"><img class="w-full" src="https://images.pexels.com/photos/7819309/pexels-photo-7819309.jpeg?auto=compress&cs=tinysrgb&dpr=1&w=500" alt=""></div>
            </div>
        </div>
    </div>

</body>
</html>
Các bạn có thể xem demo ở đây
Tổng kết
Như vậy qua bài viết này mình đã giới thiệu cho các bạn về Tailwind và cách tích hợp vào dự án Laravel. Hy vọng bài biết sẽ giúp ích cho các bạn phần nào. Cảm ơn các bạn đã theo dõi đến hết bài viết ❤️.