Chào mừng các bạn trở lại với series tutorial Nestjs của mình. Ở bài trước mình đã giới thiệu về setup repository + typeorm tại đây. Để tiếp tục series mình cùng các bạn sẽ tìm hiểu vể JWT trong Nestjs sử dụng Passportjs. Bắt đầu nhé
1. Giới thiệu
Json Web Token (JWT) là một tiêu chuẩn mở định nghĩa một cách nhỏ gọn và khép kín để truyền thông tin an toàn giữa các bên dưới dạng đối tượng JSON. Thông tin này có thể được xác minh và đáng tin cậy vì nó được ký điện tử. JWT có thể được ký bằng cách sử dụng bí mật (với thuật toán HMAC ) hoặc cặp khóa công khai / riêng tư bằng RSA hoặc ECDSA.
JWT cũng hỗ trợ cho rất nhiều ngôn ngữ và framework khác nhau như: python, php, laravel, .Net ... đặc biệt trong đó có cả Nestjs. Hiện nay khi nhắc đến xác thực cho Web API người ta cũng thường nhắc đến JWT.


2. Cài đặt các packet, directory stucture, migration User
-
Trước tên chúng ta cần install các packege sau:
> npm i bcrypt > npm install class-validator > npm i @nestjs/passport passport passport-local > nest i @nestjs/jwt passport-jwt -
Tiếp đến là folder structure của dự án:
src/ ├── auth/ │ ├── dto/ │ │ └── create-user.dto.ts │ ├── guards/ │ │ ├── auth.guard.ts │ │ └── local.guards.ts │ ├── interfaces/ │ │ └── auth-payload.interface.ts │ ├── strategies │ │ ├── jwt.strategy.ts │ │ └── local.strategy.ts │ ├── auth.controller.ts │ ├── auth.module.ts │ └── auth.service.ts ├── databse/ │ ├── migrations/ │ │ └── 123456789-userTable.ts └── models/ ├── users/ │ ├── interfaces/ │ │ └── user.interface.ts │ ├── entities/ │ │ └── user.entity.ts │ ├── serializers/ │ │ └── user.serializer.ts │ ├── user.controller.ts │ ├── user.module.ts │ ├── user.repository.ts │ └── user.service.ts ├── model.repository.ts └── model.serializer.ts -
tạo migration for users table
  import { MigrationInterface, QueryRunner, Table } from 'typeorm';

  export class createUserTable1633225887055 implements MigrationInterface {
  public async up(queryRunner: QueryRunner): Promise<void> {
    await queryRunner.createTable(
      new Table({
        name: 'users',
        columns: [
          {
            name: 'id',
            type: 'bigint',
            isPrimary: true,
            isGenerated: true,
            generationStrategy: 'increment',
          },
          {
            name: 'email',
            type: 'varchar',
            isNullable: true,
          },
          ............... // các cloumn tùy các bạn define
          {
            name: 'password',
            type: 'varchar',
            isNullable: true,
          },
          {
            name: 'created_at',
            type: 'timestamp',
            isNullable: true,
            default: 'now()',
          },
          {
            name: 'updated_at',
            type: 'timestamp',
            isNullable: true,
            default: 'now()',
          },
        ],
      }),
    );
  }

  public async down(queryRunner: QueryRunner): Promise<void> {
    await queryRunner.dropTable('users');
  }
}
3. Định nghĩa UserService và Validation cho chức năng tạo mới user
-
Đầu tiên là models/user.repository.ts
import { EntityRepository } from 'typeorm'; ... @EntityRepository(User) export class UsersRepository extends ModelRepository<User, UserEntity> /** * function get user by email */ async getUserByEmail(email: string): Promise<UserEntity> { return await this.findOne({ where: { email: email }, }).then((entity) => { if (!entity) { return Promise.reject(new NotFoundException('Model not found')); } return Promise.resolve(entity ? this.transform(entity) : null); }); } ...... bài trước mình đã có hướng dẫn cụ thể các bạn có thể tham khảo lại } -
tiếp theo là models/user.service.ts
import { Injectable } from '@nestjs/common'; .... @Injectable() export class UsersService { constructor( @InjectRepository(UsersRepository) private usersRepository: UsersRepository, ) {} ..... async create(inputs: CreateUserDto): Promise<UserEntity> { // nếu đang thắc mắc là trên userRepository không có function createEntity? // đừng lo vì nó đã được mình định nghĩa trong modelRepository rồi return await this.usersRepository.createEntity(inputs); } async getUserByEmail(email: string): Promise<UserEntity> { return await this.usersRepository.getUserByEmail(email); } } -
tiếp đến để sử dụng userService ở các module khác thì ta cần export nó trong models/user.module.ts
import ... @Module({ imports: [ConfigModule, TypeOrmModule.forFeature([UsersRepository])], controllers: [UsersController], providers: [UsersService, ConfigModule, JsonWebTokenStrategy], exports: [UsersService], }) -
Tiếp đến chúng ta cần validation cho function create user auth/create-user.dto.ts
import { IsEnum, ... } from 'class-validator'; export class CreateUserDto { @IsString() @MaxLength(255) @IsNotEmpty() name: string; @IsEmail() email: string; @IsNotEmpty() password: string; } -
function create user auth/auth.controller.ts
import { Post } from '@nestjs/common'; import { CreateUserDto } from './dto/CreateUser.dto'; @Controller() export class AuthController { constructor( private userService: UsersService, private authService: AuthService, ) {} //fucntion register user @Post('/register') async registerUser(@Body() input: CreateUserDto) { const check = await this.validate(input.email); if (!check) { throw new HttpException( { message: 'User already exists' }, HttpStatus.BAD_REQUEST, ); } input.password = await this.authService.hashPassword(input.password); return this.userService.create(input); } //handle login @UseGuards(LocalAuthGuard) @Post('/login') async login(@Request() request): Promise<any> { return this.authService.login(request.user); } @UseGuards(AuthenticationGuard) @Get('users/:id') async getUserById(@Param() params): Promise<UserEntity> { const user = await this.usersService.findById(params.id); this.throwUserNotFound(user); return user; } //check user exists by email async validate(email: string) { try { const users = await this.userService.geUsersByEmail(email); return users.length <= 0; } catch (e) { return false; } } }- tiếp đến để sử dụng userService ta cần import nó trong models/auth.module.ts
    import ...

    @Module({
      imports: [
        UsersModule,
        TypeOrmModule.forFeature([UsersRepository]),
      ],
      providers: [AuthService, UsersService],
      controllers: [AuthController],
    })
4. Authentication & authorization
- Định nghĩa auth/interfaces/auth-payload.interface.ts đây sẽ là định nghĩa các thông tin sẽ được lưu trong payload của JWT
export interface AuthPayload { id: number | string; name: null | string; email: string; } - tiếp đến chúng ta sẽ cần định nghĩa auth/auth.service.ts
import { Injectable } from '@nestjs/common'; ... @Injectable() export class AuthService { constructor( private jwtService: JwtService, private userService: UsersService, ) {} //function hash password async hashPassword(password: string): Promise<string> { return await bcrypt.hash(password, 12); } //function compare password param with user password in database async comparePassword( password: string, storePasswordHash: string, ): Promise<any> { return await bcrypt.compare(password, storePasswordHash); } async authentication(email: string, password: string): Promise<any> { const user = await this.userService.getUserByEmail(email); const check = await this.comparePassword(password, user.password); if (!user || !check) { return false; } return user; } async login(user: UserEntity) { const payload: AuthPayload = { name: user.name, email: user.email, id: user.id, }; return { access_token: this.jwtService.sign(payload) }; } } - Định nghĩa auth/strategies/local.strategy.ts
import { PassportStrategy } from '@nestjs/passport'; ... @Injectable() export class LocalStrategy extends PassportStrategy(Strategy) { constructor(private authService: AuthService) { super({ usernameField: 'email' }); // ở đây mình đăng nhập bằng email và password nên mình phải thực hiện custom usernameField } async validate(email: string, password: string): Promise<UserEntity> { const user = await this.authService.authentication(email, password); if (!user) { throw new UnauthorizedException(); } return user; } } - Định nghĩa auth/strategies/jwt.strategy.ts
import { PassportStrategy } from '@nestjs/passport'; ... @Injectable() export class JsonWebTokenStrategy extends PassportStrategy(Strategy) { constructor() { super({ jwtFromRequest: ExtractJwt.fromAuthHeaderAsBearerToken(), ignoreExpiration: false, secretOrKey: 'JWT_SECRET_KEY', }); } async validate(payload: AuthPayload) { return { name: payload.name, email: payload.email, id: payload.id }; } } - Định nghĩa auth/guards/auth.guard.ts
import { AuthGuard } from '@nestjs/passport'; import { Injectable } from '@nestjs/common'; @Injectable() export class AuthenticationGuard extends AuthGuard('jwt') {} - Định nghĩa auth/guards/local.guard.ts
import { AuthGuard } from '@nestjs/passport'; import { Injectable } from '@nestjs/common'; @Injectable() export class LocalAuthGuard extends AuthGuard('local') {} - Cuối cùng ta cần update auth/auth.module.ts
   import { Module } from '@nestjs/common';
   ...
   @Module({
     imports: [
       UsersModule,
       TypeOrmModule.forFeature([UsersRepository]),
       PassportModule,
       JwtModule.register({
         secret: 'JWT_SECRET_KEY',
         signOptions: { expiresIn: '60m' },
       }),
     ],
     providers: [AuthService, UsersService, LocalStrategy, JsonWebTokenStrategy],
     controllers: [AuthController],
   })
   export class AuthModule {}
5. Giải thích về request lifecycle
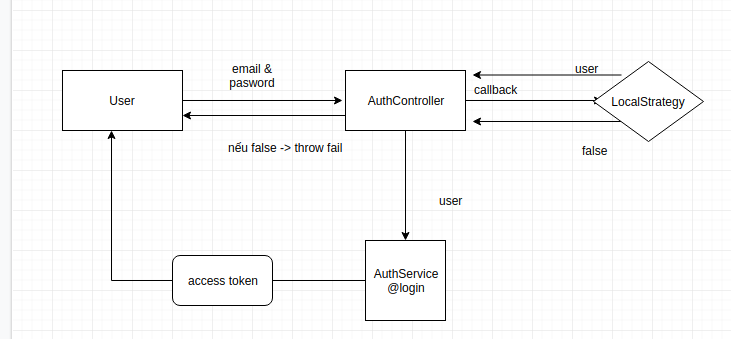
- function login: người dùng gửi yêu cầu -> [email protected] -> gửi callback đến -> [email protected] -> nếu respose là user thì sẽ trả về token, nếu false sẽ throw error


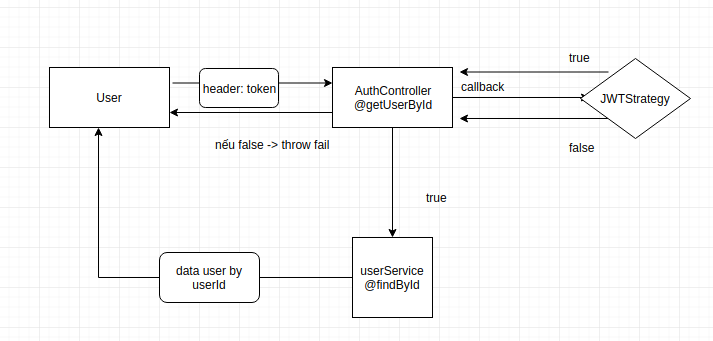
- function get UserById: người dùng gửi yêu cầu "localhost/user/{id} " -> [email protected]> gửi callback đến -> [email protected] (check token) -> nếu respose là user thì sẽ trả về user by id, nếu false sẽ throw error


6. Kết luận
- Đợt này dự án mình cũng hơi nhiều việc nên ra bài hướng dẫn khác chậm. Hy vọng bài viết này đã giúp bạn. Nếu có bất kì thắc mắc hãy liên hệ với mình
- Trong phần tiếp theo mình sẽ giới thiệu relationship trong Nestjs + typeOrm, rất mong được các bạn ủng hộ.
- Bạn cũng có thể tham khảo của mình Repository : Tại đây