Node.js đang dần trở nên phổ biến với những ứng dụng dạng microservice hay REST Api bới hiệu năng cực nhanh và tính bất đồng bộ của chúng. Đặc biệt là rất gọn nhẹ và xử lý đồng thời nhiều request với thời gian phản hồi siêu nhanh.
Nhưng dù bất kể ngôn ngữ nào chúng ta cũng cần xây dựng một khung sườn (skeleton) vững chắc để có thể bám theo nó để dễ dàng maintain và phát triển nó. Vậy nên hôm nay chúng ta cùng nhau chia sẻ và xây dựng một skeleton riêng cho mình nhé.
Construct
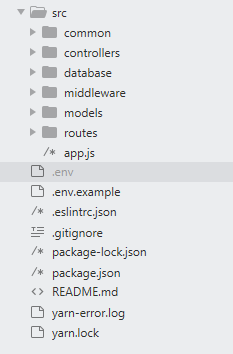
Cũng giống như các ngôn ngữ REST API khác chúng ta cũng có thể xây dựng skeleton theo dạng MVC pattern. Nhưng ở bài viết này chúng ta chỉ xây dựng đến API chỉ cần sử dụng đến controller và models kết hợp với middleware để kiếm soát các request và response. Các bạn có thể tham khảo dưới đây:

Cấu trúc thư mục gồm:
- common: các functions, contants chung cho toàn dự án.
- controllers: các action điều hướng xử lý các request và response.
- database: chứa các file config kết nối mongosee, mysql, vv...
- middleware: chứa các rules để kiếm soát các request và response .
- models: chứa các model và function xử lý dữ liệu.
- routes: chứa các function thiếu lập điều hướng với các route.
Init skeleton
Trước khi xây dựng server REST API với Express, chúng ta cần cài đặt một số thư viện cơ bản như sau:
"dependencies": {
    "bcrypt": "^5.0.0",
    "body-parser": "^1.18.2",
    "express": "^4.16.2",
    "jquery": "^3.5.1",
    "jsonwebtoken": "^8.1.0",
    "mongoose": "^5.9.25",
    "nodemon": "^2.0.4",
    "request": "^2.83.0",
    "request-promise": "^4.2.2",
    "validator": "^9.1.1"
  },
  "devDependencies": {
    "env-cmd": "^10.1.0"
  }
Vì database chúng ta sẽ sử dụng là mongo nên sẽ cần sử dụng mongoose để truy xuất database và sẽ cần env-cmd để load file .evn (các biến môi trường).
Database
mongoose.js chứa thông tin cấu hình kết nối mongodb.
let mongoose = require('mongoose');
mongoose.Promise = global.Promise;
mongoose.connect(process.env.MONGODB_URL, {
  useNewUrlParser: true,
  useCreateIndex: true,
});

module.exports = mongoose;
Models
use.model.js chứa thông tin khởi tạo Schema kèm theo đó là các functions. Chúng ta hoàn toàn có thể tách schema ra thành một thư mục riêng để code có thể clear và rõ ràng hơn.
const mongoose = require('mongoose');
const bcrypt = require('bcrypt');
const jwt = require('jsonwebtoken');

const UserSchema = new mongoose.Schema (
  {
    username: {
      type: String,
      lowercase: true,
      required: [true, 'can\'t be blank'],
      match: [/^[a-zA-Z0-9]+$/, 'is invalid'],
      index: true
    },
    email: {
      type: String,
      lowercase: true,
      required: [true, 'can\'t be blank'],
      match: [/\[email protected]\S+\.\S+/, 'is invalid'],
      index: true
    },
    password: {
      type: String,
      required: true,
      minLength: 7
    },
    tokens: [{
      token: {
        type: String,
        required: true
      }
    }]
  },
  {timestamps: true}
);

UserSchema.pre('save', async function(next) {
  const user = this;
  if (user.isModified('password')) {
    user.password = await bcrypt.hash(user.password, 8);
  }
  next();
});

UserSchema.methods.toAuthJSON = function() {
  return {
    username: this.username,
    email: this.email,
    token: this.generateAuthToken()
  };
};

UserSchema.methods.generateAuthToken = function() {
  const token = jwt.sign(
    {
      _id: this._id,
      username: this.username
    },
    process.env.JWT_KEY
  );
  this.tokens = this.tokens.concat({token});
  this.save();

  return token;
};

UserSchema.statics.findByCredentials = async(email, password) => {
  const user = await User.findOne({email});

  if (!user) {
    throw new Error({error: 'Invalid login credentials'});
  }

  const isPasswordMatch = await bcrypt.compare(password, user.password);

  if (!isPasswordMatch) {
    throw new Error({error: 'Invalid login credentials'});
  }

  return user;
};

const User = mongoose.model('User', UserSchema);

module.exports = User;
Middleware
auth.middleware.js để bảo mật chúng ta cần verify lại request trước khi cho phép cấp quyền tiếp tục tương tác bằng cách kiểm tra token với header Authorization.
const User = require('../models/user.model');
const jwt = require('jsonwebtoken');

const auth = async(req, res, next) => {
  const token = req.header('Authorization').replace('Bearer ', '');
  const data = jwt.verify(token, process.env.JWT_KEY);

  try {
    const user = await User.findOne({_id: data._id, 'tokens.token': token});

    if (!user) {
      throw new Error();
    }
    req.user = user;
    req.token = token;
    next();
  } catch (error) {
    res.status(401).send({error: 'Not authorized to access this resource'});
  }

};

module.exports = auth;
Routes
index.js sẽ đóng vài trò load toàn bộ cấu hình route
const express = require('express');
const authRoute = require('./auth.routes');
const router = express.Router();

router.use('/', authRoute);

module.exports = router;
auth.route.js sẽ thiết lập các phương thức xử lý và điều hướng chúng tới các controller - action. Chúng ta sẽ chia ra làm 2 loại route là public và private bằng cách thiết lập middleware cho chúng.
let router = require('express').Router();
const AuthController = require('../controllers/auth.controller');
const auth = require('../middleware/auth.middleware');

//public
router.post('/login', AuthController.login);
router.post('/signup', UserController.signup);

//private
router.post('/logout', auth, AuthController.logout);
router.post('/logout-all', auth, AuthController.logoutAll);

module.exports = router;
Controllers
Ở đây, chúng ta cần tạo ra các function tương ứng với các action như đã khai báo tại auth.route.js. Các action đóng vài trò điều hướng và xử lý dữ liệu trả về trước khi response trở lại.
auth.controller.js
const User = require('../models/user.model');

function AuthController()
{
  this.signup = (req, res) => {
    try {
      let user = new User();

      user.username = req.body.username;
      user.email = req.body.email;
      user.password = req.body.password;

      user.save().then(function(){
        return res.json({user: user.toAuthJSON()});
      }).catch(function (error) {
        return res.status(400).json(error);
      });
    } catch (error) {
      return res.status(400).json(error);
    }
  };

  this.login = async(req, res) => {
    try {
      const {email, password} = req.body;
      const user = await User.findByCredentials(email, password);

      if (!user) {
        return res.status(401).send({error: 'Login failed! Check authentication credentials'});
      }

      res.send({user: user.toAuthJSON()});
    } catch (error) {
      res.status(400).send({error: 'Login failed'});
    }
  };

  this.logout = async(req, res) => {
    try {
      req.user.tokens = req.user.tokens.filter((token) => {
        return token.token != req.token;
      });

      await req.user.save();
      res.send({'message': 'Logout Done!'});
    } catch (error) {
      res.status(500).send(error);
    }
  };

  this.logoutAll = async(req, res) => {
    try {
      req.user.tokens.splice(0, req.user.tokens.length);
      await req.user.save();
      res.send();
    } catch (error) {
      res.status(500).send(error);
    }
  };

  return this;
}

module.exports = AuthController();
Create server run app
Tạo app.js với nội dung như sau:
const express = require('express');
const port = process.env.PORT || 3000;
const app = express();
const route = require('./routes/index');
const bodyParser = require('body-parser');
require('./database/mongoose');

app.use( bodyParser.json() );
app.use( express.json() );
app.use('/', route);

app.listen(port, () => {
  console.log('Server listening on ' + port);
});
Vì chúng ta cần xử lý dữ liệu dưới dạng json vậy nên sẽ cần parser json với bodyParser. Tiếp đó load toàn bộ route với require('./routes/index');
Trước khi chạy thử chúng ta cần config lại package.json để ứng dụng có thể load được các biến môi trường với:
"scripts": {
    "start": "env-cmd -f ./.env node src/app.js",
    "dev": "env-cmd -f ./.env nodemon --exec \"node src/app.js\""
  }
nodemon sẽ được sử dụng như một công cụ tự động reload lại app sau khi save thành công.
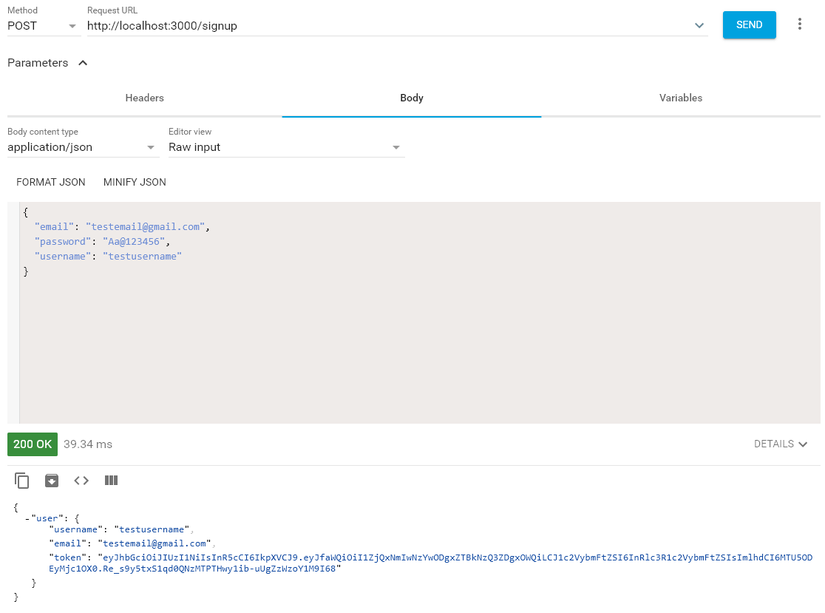
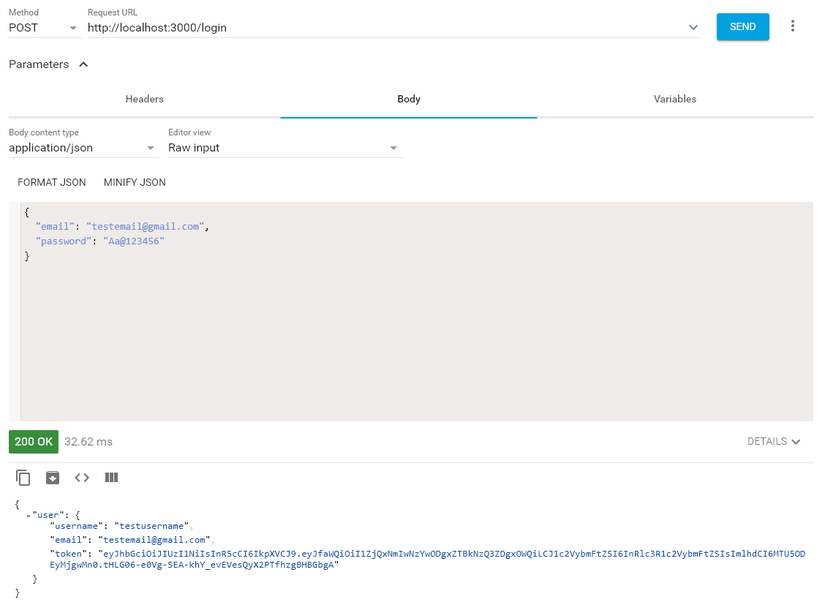
Tiếp theo, chúng ta thử chạy thử skeleton nhé. http://localhost:3000/
Signup API

Login API

Kết luận
Như vậy, chúng ta đã có thể tạo ra một bộ skeleton đơn giản với đầy đủ những tính năng cơ bản như login, signup, logout. ngoài ra chúng ta có thể tự bổ sung cho mình một bộ skeleton đầy đủ hơn với nhiều những tính năng hay ho khác. Hy vọng bài viết sẽ hữu ích với các ae Newbie ngôn ngữ này. Mọi đóng góp sẽ giúp tác giả hoàn thiện hơn trong những bài viết tiếp theo.