Middleware, Interceptor và Pipes củng không quá xa lạ với những anh em code Nestjs.Nhưng ai trong chúng ta củng từng cảm thấy confure giữa các khái niệm này, đặc biệt là những ae mới tiếp cận nestjs. Hôm nay mình sẽ trình bày về cái nhìn tổng quan về sự khác biệt.
1. Middleware
Middleware là một hàm được gọi trước khi tới handler route.Bạn có quyền truy cập vào các object request
và response cũng như hàm middleware next() trong chu trình request-response của ứng dụng, nhưng bạn
không có kết quả của trình handler route. Về cơ bản chúng là các chức năng Middleware thể hiện.

Nhiệm vụ
- Thực thi bất kỳ đoạn code nào.
- Thực hiện các thay đổi đối với request và response object.
- Kết thúc chu kỳ request-response.
- Gọi hàm middleware tiếp theo trong ngăn xếp.
- Nếu hàm middleware hiện tại không kết thúc chu kỳ request-response, nó phải gọi next() để chuyển quyền điều khiển cho hàm middleware tiếp theo. Nếu không, request sẽ bị treo.
Đăng ký
- Implements middleware trên 1 method hoặc 1 class với decorator @Injectable()
Khởi tạo middleware
logger.middleware.ts
import { Injectable, NestMiddleware } from '@nestjs/common';
import { Request, Response, NextFunction } from 'express';
@Injectable()
export class LoggerMiddleware implements NestMiddleware {
  use(req: Request, res: Response, next: NextFunction) {
    console.log('Authentication...');
    next();
  }
}
Apply middleware
- Để thiết lập 1 middleware bằng method configure() của class module.Các lớp module include middleware phải implement interface NestModule.Bây giờ tôi sẽ thiết lập LoggerMiddleware cho studentModule. student.module.ts
import {
  MiddlewareConsumer,
  Module,
  NestModule,
  RequestMethod,
} from '@nestjs/common';
import { StudentController } from './controller/student.controller';
import { LoggerMiddleware } from './middleware/logger.middleware';
import { StudentService } from './service/student.service';

@Module({
  providers: [StudentService],
  controllers: [StudentController],
})
export class StudentModule implements NestModule {
  configure(consumer: MiddlewareConsumer) {
    consumer
      .apply(LoggerMiddleware)
      .forRoutes({ path: 'student', method: RequestMethod.GET });
    consumer
      .apply(LoggerMiddleware)
      .forRoutes({ path: 'student/:id', method: RequestMethod.GET });
  }
}
Ví dụ về Middleware
- FrontendMiddleware: chuyển hướng tất cả các route ngoại trừ API đến index.html
- Bạn có thể sử dụng bất kỳ middleware nhanh nào có sẵn. Có rất nhiều thư viện, ví dụ: body-parser hoặc morgan
Ưu & Nhược điểm của middleware
- Ưu điểm: Việc đăng ký phần mềm trung gian rất linh hoạt, ví dụ: áp dụng cho tất cả các router trừ một router, v.v.
- Hạn chế: Nhưng vì chúng được đăng ký trong module,bạn có thể không nhận ra nó áp dụng cho router của mình khi bạn đang xem các phương thức của nó
2. Pipes
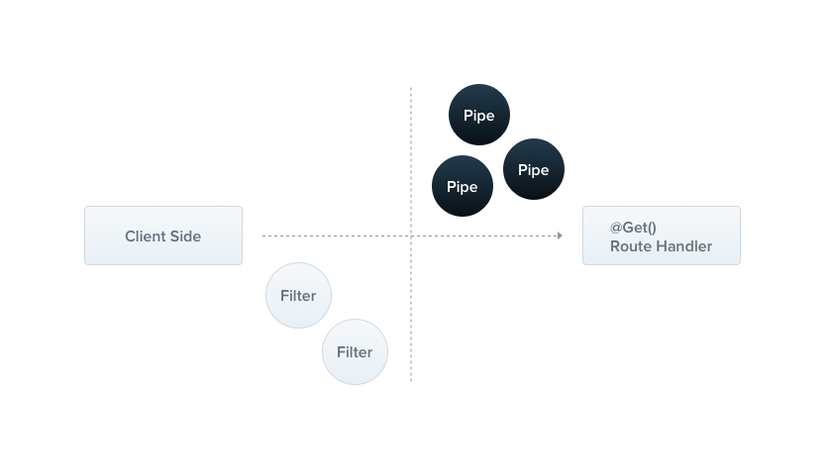
Pipes là một hàm được gọi trước khi tới handler route và được sử dụng để chuyển đổi dữ liệu đầu vào
Nhiệm vụ
Pipes có hai trường hợp sử dụng điển hình:
- transformation: chuyển đổi dữ liệu đầu vào sang dạng mong muốn (ví dụ: từ chuỗi thành số nguyên)
- validation: đánh giá dữ liệu đầu vào và nếu hợp lệ, chỉ cần chuyển nó qua không thay đổi; nếu không, hãy ném một exception khi dữ liệu không chính xác

Đăng ký
Pipes là một lớp được chú thích bằng @Injectable(). Pipes implement interface PipeTransform. Nest đi kèm với 6 Pipess có sẵn dùng được ngay:
- ValidationPipe
- ParseIntPipe
- ParseBoolPipe
- ParseArrayPipe
- ParseUUIDPipe
- DefaultValuePipe
Binding Pipes
@Get(':id')
async findOne(@Param('id', ParseIntPipes) id: number) {
  return this.catsService.findOne(id);
}
Khi thực hiện như này thì id phải thuộc kiểu integer, trong trường hợp bạn gọi 1 đường dẫn mà typeof id != integer (GET localhost:3000/abc) pipes sẽ bắn ra exception
{
  "statusCode": 400,
  "message": "Validation failed (numeric string is expected)",
  "error": "Bad Request"
}
3. Interceptor
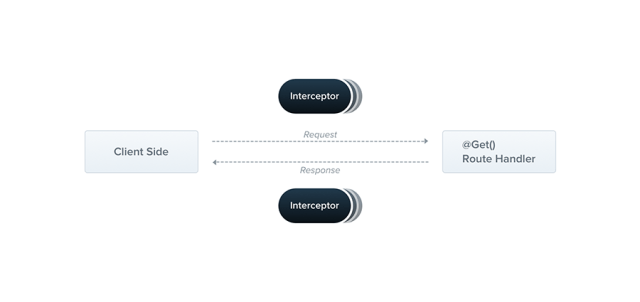
Interceptor có quyền truy cập vào request/ response trước và sau khi handler route được gọi.
Nhiệm vụ
Interceptor có thể sữ dụng vào việc:
- ràng buộc logic bổ sung trước / sau khi thực thi phương thức
- biến đổi kết quả trả về từ một hàm
- biến đổi exception được ném ra từ một hàm
- mở rộng hành vi function cơ bản
- ghi đè hoàn toàn một function tùy thuộc vào các điều kiện cụ thể (ví dụ: cho mục đích lưu vào bộ nhớ đệm)

Đăng ký
Một Interceptor là một lớp được chú thích bằng decorator @Injectable(). Các Interceptors phải implement interface NestInterceptor.
Khởi tạo interceptor
import { Injectable, NestInterceptor, ExecutionContext, CallHandler } from '@nestjs/common';
import { Observable } from 'rxjs';
import { tap } from 'rxjs/operators';

@Injectable()
export class LoggingInterceptor implements NestInterceptor {
  intercept(context: ExecutionContext, next: CallHandler): Observable<any> {
    console.log('Before...');

    const now = Date.now();
    return next
      .handle()
      .pipes(
        tap(() => console.log(`After... ${Date.now() - now}ms`)),
      );
  }
}
Để đăng kí interceptor cho đối tượng muốn sữ dụng:
- Sữ dụng decorator @UseInterceptors() khi muốn thiết lập interceptor với phạm vi method hoặc class
@UseInterceptors(new LoggingInterceptor())
export class StudentController {}
- Sữ dụng app.useGlobalInterceptors() trong main.ts để thiết lập interceptor trên phạm vi toàn cục
const app = await NestFactory.create(AppModule);
app.useGlobalInterceptors(new LoggingInterceptor());
Ví dụ về trường hợp dùng interceptor
- LoggingInterceptor: Yêu cầu trước handler route và sau đó là kết quả của nó. Đảm bảo thời gian cần thiết.
- ResultMapping: Chuyển đổi null thành [] hoặc bao bọc kết quả trong một đối tượng phản hồi: users->{users: users}
Ưu & Nhược điểm của interceptor
- Ưu điểm: Giúp ta có thể xử lí 1 đoạn logic gì đó cả trước và sau khi router được handler
- Hạn chế: bạn không thể setup response hoặc thay đổi response với Interceptors khi bạn gửi đối tượng response dành riêng cho thư viện @Res() trong trình handler router của mình

Kết luận
- Khi mà đọc tới đây thì bạn đã có cái nhìn tổng quan về sự khác biệt giữa middleware,pipes and Interceptor.Dựa vào đó mà bạn có thể xác định khi nào thì nên sài middleware,pipes and Interceptor sao cho hợp lí.
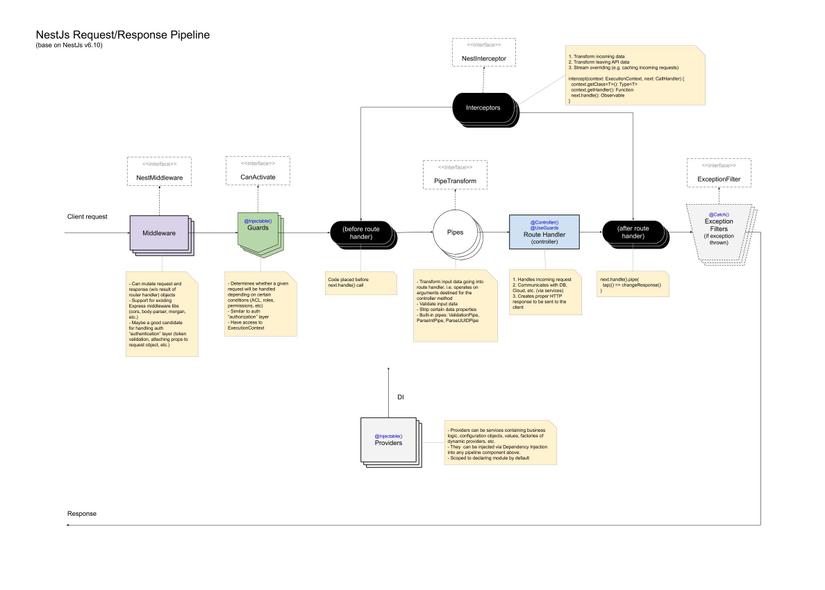
- Thứ tự xử lí request sẽ là như sau: Middleware -> Interceptors -> Pipes -> Route Handler -> Interceptors
- Khi bạn muốn chuyển đổi dữ liệu đầu vào trước khi xữ lý thì hãy chọn Pipes
- Khi bạn chỉ muốn thực hiện 1 đoạn logic nào đó trước khi handler router thì nên dùng middleware
- Còn trường hợp bạn muốn xử lí logic gì đó trước và sau handler router thì nên dùng interceptor
Happy coding !