Tại sao mình viết series này ?
Dù trên internet có rất nhiều tài liệu viết về DDD nhưng chắc hẳn mọi người chỉ đọc hiểu sơ mà không biết làm sao để đưa nó vào project của mình. Nhân tiện hiện tại trong dự án mình làm cũng áp dụng mô hình này nên chia sẻ trong tầm hiểu biết cho mọi người có thể hiểu rõ hơn về cách áp dụng nó nhé !
Nếu có gì sai sót mọi người cũng chỉ cho mình để mình sửa nhé ! Nào cũng nhau bắt đầu thôi !
Công nghệ sử dụng
Với mình trong một dự án, mình sẽ hạn chế có thể nhất sự phụ thuộc vào Framework cụ thể nào đó. Vậy nên mọi người cũng đừng quá quan trọng là mình viết cho Framework nào nhé !
Trong series này mình sẽ viết API sử dụng Laravel.
Nói sơ về mình viết API cho cái quái gì?
Tưởng tượng là bạn đang viết một Open API cho hệ thống của công ty bạn quản lý vật tư cho các công ty.
Ví dụ: Công ty A sử dụng API của bạn để tạo, sửa, lấy, xóa thông tin của vật tư để cho vào hệ thống. Nghĩa là mình sẽ cần khoảng 3 API cho việc này.
Let's go
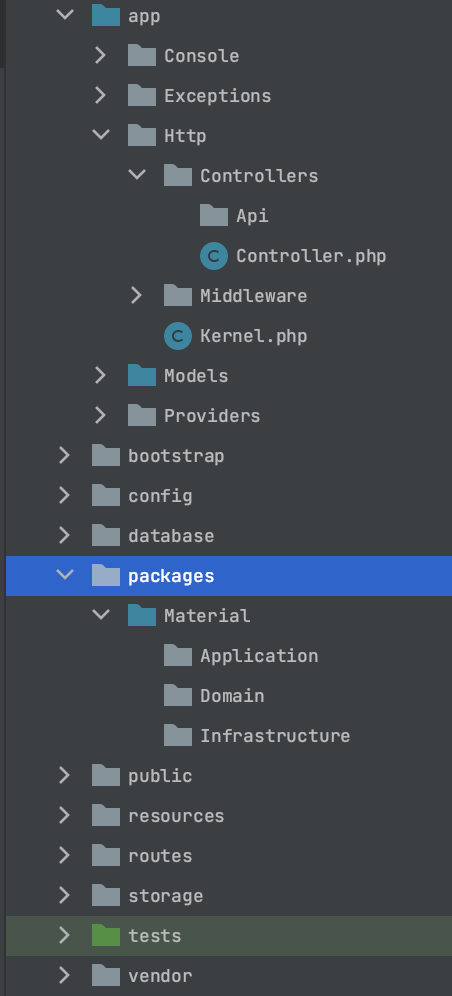
Cấu trúc thư mục

- Application sẽ đưa chia thành 4 Layers:
- User Interface Layer: Ở layer này thì ta chỉ sẽ tiếp nhận các input (params, request data...) từ user gửi vào để đưa sang Application Layer. (Bên hình nó sẽ nằm trong Controllers/Api)
- Application Layer: làm nhiệm vụ coordinate các Activity của Application và không chứa Business Logic
- Domain Layer: Trái tim của Application, chứa các Models của application. Ở lớp này dù bạn có thay đổi Framework giữa chừng đi chăng nữa thì lớp này cũng không có sự thay đổi gì, nghĩa là độc lập với Framework.
- Infrastructure Layer: Cung cấp các chức năng khác như lưu trữ, trao đổi với Database.
Code rule & Naming convention
Mình sẽ tự thống nhất và đặt ra các quy tắc cho phù hợp với phong cách code của team. Với team mình thì có một vài quy tắc như sau:
- Với 1 API thì sẽ được thực hiện trong 1 set: 1 Controller, 1 Application, 1 Infrastructure. Thực hiện đúng chữ S (Single responsibility principle) trong SOLID
- Với Controller: Đặt tên theo kiểu XXXListGetController với get 1 danh sách, XXXGetController với get 1 record, tương tự với XXXListPostController, XXXPostController, XXXDeleteController...
- Các Layer giao tiếp với nhau thông qua Interface. (Lợi ích của việc giao tiếp với nhau bằng interface thì mình sẽ đề cập sau.)
API: Thêm mới các danh sách vật tư POST
- Ở đây để đơn giản mình sẽ viết API để thêm 1 vật tư với
Request body :
{
   "data": {
       "code": string // Mã code vật tư
       "name": string
    }
}
User interface layer
- Ở Controller chức năng chính chỉ là nhận input đẩy nó sang Application, return kết quả được xử lý.
MaterialPostController.php
// Instance của Infrastructure layer
private IMaterialRepository $materialRepository;

public function __construct(IMaterialRepository $materialRepository)
{
    $this->materialRepository = $materialRepository;
}

public function __invoke(Request $request)
{
    $requestData = $request->get('data');

    // Class chứa danh sách Input của User
    // để có thể mở rộng thêm input thì ở constructor
    // ta sẽ không truyền tham số trực tiếp vào mà set thông qua phương thức setter.
    $command = new MaterialPostCommand();
    $command->setCode($requestData['code']);
    $command->setName($requestData['name']);

    $service = new MaterialPostApplicationService($this->materialRepository);

    // Đẩy user input qua Application layer để xử lý
    $result = $service->handle($command);

    return response()->json($result->toArray()); // Parse to JSON
}
Application layer
- Class chỉ chứa premitive value là input của user
MaterialPostCommand.php
    private ?string $code;

    private ?string $name;

    public function __construct()
    {
        $this->code = null;
        $this->name = null;
    }

    /**
     * @return string|null
     */
    public function getCode(): ?string
    {
        return $this->code;
    }

    /**
     * @param string|null $code
     */
    public function setCode(?string $code): void
    {
        $this->code = $code;
    }

    /**
     * @return string|null
     */
    public function getName(): ?string
    {
        return $this->name;
    }

    /**
     * @param string|null $name
     */
    public function setName(?string $name): void
    {
        $this->name = $name;
    }
- MaterialPostApplicationService.php
final class MaterialPostApplicationService implements IMaterialPostApplicationService
{
    private $materialRepository;

    public function __construct(IMaterialRepository $materialRepository)
    {
        $this->materialRepository = $materialRepository;
    }

    /**
     * @throws \Throwable
     */
    public function handle(MaterialPostCommand $command): void
    {
        // Nhận premitive value từ controller -> value object
        $code = new MaterialCode($command->getCode());
        $name = new MaterialName($command->getName());

       // Factory: Có chức năng Tạo Entity
        $factory = new MaterialFactory();

        // ValidationSpecification: Có chức năng Validate Entity
        $validator = new MaterialValidationSpecification();

        DB::beginTransaction();
        try {

            $material = $factory->create($code, $name);
            if (!$validator->isSastified()) {
                throw new \Exception();
            }

            // Đẩy entity đã được validation qua Infrastructure để create record
            $this->materialRepository->create($material);

            // Nếu mọi thứ OK -> Commit transaction
            DB::commit();
        } catch (\Throwable $ex) {
            // Nếu error được throw ra -> Rollback transaction
            DB::rollBack();
        }
    }
}
Domain layer
- Value object class: Lợi ích khi dùng nó mình cũng sẽ đề cập ở phần tiếp theo.
MaterialName.php
final class MaterialName
{
    private ?string $value;

    public function __construct(?string $value)
    {
        $this->value = $value;
    }

    /**
     * @return string|null
     */
    public function getValue(): ?string
    {
        return $this->value;
    }
}
Tương tự như vậy với MaterialCode
- Factory
MaterialFactory.php
final class MaterialFactory
{
    public function create(MaterialCode $code, MaterialName $name): Material
    {
        $entity = Material::create();
        $entity->setCode($code);
        $entity->setName($name);

        return $entity;
    }
}
- Entity
Material.php
final class Material
{
    private ?MaterialCode $code;

    private ?MaterialName $name;

    private function __construct()
    {
        $this->code = null;
        $this->name = null;
    }

    public static function create(): self
    {
        return new self();
    }

    // getter & setter ...
}
Constructor mình sẽ để thành private, chỉ cho phép create instance thông qua phương thức create
-
ValidationSpecification: Class chứa cái rule để validate entity, ví dụ trong trường hợp: code và name là trường bắt buộc, không chứa chỉ khoảng trắng,... Cái này mình sẽ nói rõ hơn ở phần sau.
-
Interface IMaterialRepository
Class chứa các phương thức trao đổi với DB như create, find, update, delete... Ta sẽ định nghĩa các phương thức ở interface này, và implement nó ở Infrastructure layer.
Ở ví dụ này thì mình create một material, mình nhận vào Material entity.
IMaterialRepository.php
interface IMaterialRepository
{
    public function create(Material $entity): void;
}
Infrastructure layer
- MaterialRepository.php
final class MaterialRepository implements IMaterialRepository
{
    public function create(Material $entity): void
    {
        $bindings = [
            $entity->getCode()->getValue(),
            $entity->getName()->getValue(),
        ];

         $sql = <<<SQL
INSERT INTO
    materials (codes, names)
VALUES
    (?, ?)
SQL;
        DB::insert($sql, $bindings);
    }
}
Ở đây thì mọi người muốn sử dụng ORM của Laravel cũng được, còn mình thì hay viết kiểu SQL rồi binding các tham số vào như thế này. Để trong trường hợp nhiều câu query phức tạp mình chỉ cần viết SQL thôi, không có mất công phải tìm cách viết nó trong Laravel như thế nào...
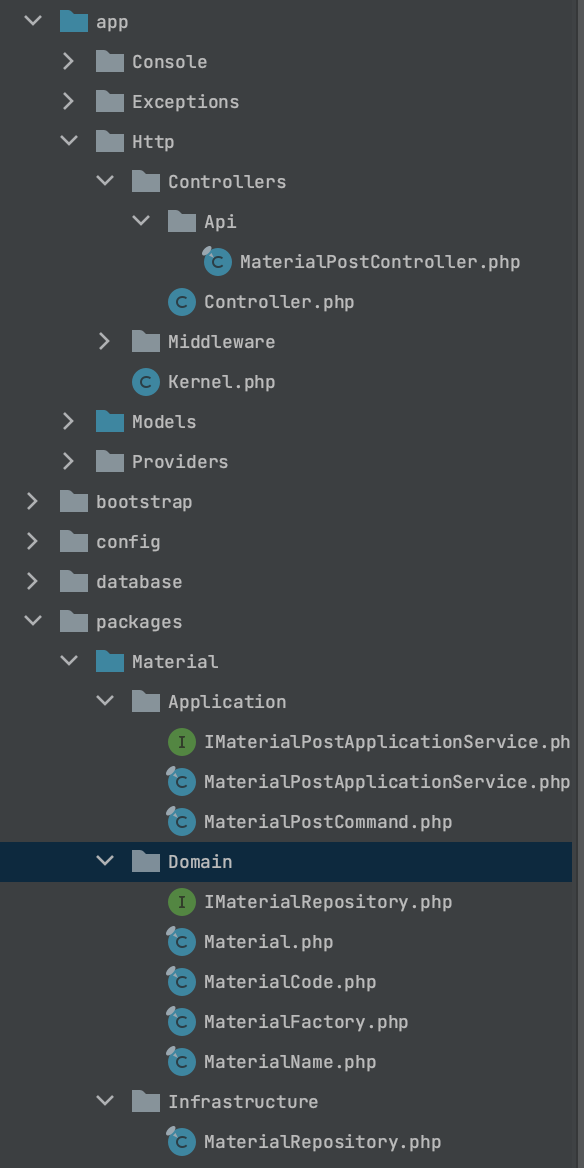
Nhìn lại cấu trúc thư mục

-
Vì trong Application sẽ có rất nhiều đối tượng, vì vậy để dễ quản lý hơn các bạn có thể tạo các sub-folder trong các layer folder. VD:
- Application/Materials/* : Layer application của đối tượng liên quan tới Material
- Application/Employees/: Layer application của đối tượng liên quan tới Employee
Tương tự như vậy cho các layer khác.
Kết
Cảm ơn mọi người đã đọc đến đây.
Ở phần này mình đã đề cập qua cách bố trí các class ở cách layer, thực thi code trong POST như thế nào.
Cũng như điểm qua một số khái niệm trong DDD
- Value Object
- Entity
- Application Service
- Factory
- Specification
- Repository
Ở phần tiếp theo mình sẽ nói về cách GET vật tư, response trả về được thực hiện như thế nào, cũng như làm rõ một số điểm mình có nhắc trong bài lần này.
Hẹn gặp lại các bạn ở phần sau !!!